Excel integrated cost planning is an extremely convenient and powerful tool for project managers. Especially, when monthly planning dollars need to be entered at the WBS element level, this proves to be the only way the project manager would ever be able to get things done on time, because it is extremely time consuming to go through the screens for each WBS element and drilldown into the period screen to enter values for each period in SAP. Moreover, when these monthly values are to be re-forecast every month for the remaining periods of the year, it becomes all the more tedious to manually key them all into SAP.
This document outlines the configuration and procedure for maintaining monthly project cost planning values into a plan version using integrated Excel planning. The procedure begins with uploading plan values from an Excel spreadsheet where planning has been carried out offline. Once the values have been uploaded into SAP, they can easily be transferred to a different plan version or evaluated in the project information system.
NOTE: Cost planning by period requires that you plan by fiscal year, period and cost element. If required, a dummy cost element could be created and assigned to the planning profile assigned to the project profile.
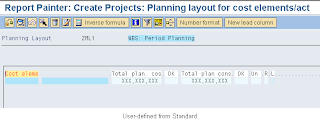

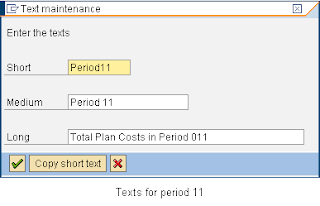
 Change the texts to something like this.
 Notice that the column text is now changed to Period 12. Click just next to the Period 12 column and follow the menu path below to create a column for Period 11.
Choose “Key figure with characteristic”.
Enter Period 011 for the Period characteristic value.
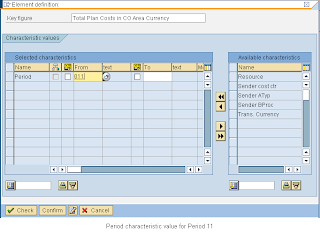 Change the texts on this element to reflect Period 11.
 Repeat the steps above to add periods 010 to 001. Note to click the cursor just next to the left-most Period column to insert a new column/element. When all the periods are done, the layout now looks like below.
 If all the columns don’t appear on the screen, click on the next page icon.
Create Planner Profiles
Select the configuration path to create planner profiles for cost planning.
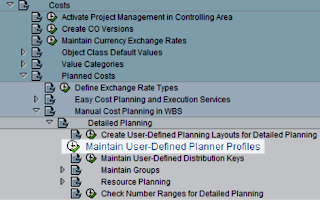 Click on New Entries. Enter Profile name and description.
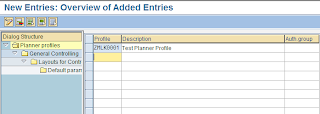 Select the line for the new planner profile and select “General Controlling”. Select “WBS Elements: cost elements/act input for Planning Area.
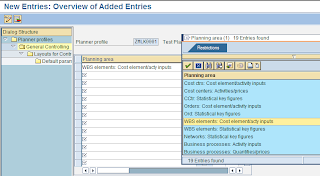 Then, click on Layouts for Controlling. Select the checkboxes for Overview and Integrated Excel planning to allow for Excel planning upload for the planner profile. Also, enter a file descriptor.
 Click on Default Settings and enter a default version, fiscal year, WBS element and cost element and click on the Overview Screen icon.
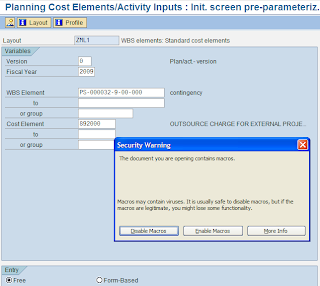 Click on Enable Macros. The planning layout is opened in Excel with the specified default parameters. Select to save the file descriptors and the excel file.
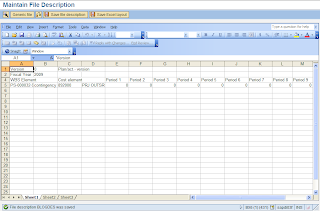
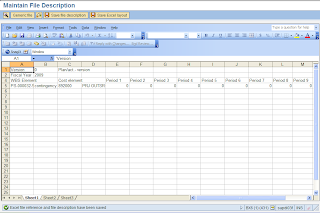 Also, remember to save the excel file to the local disk since the file will be used to upload planning values later into SAP. Click the back icon and click Save again. The following message appears – “Preset parameters were saved”.
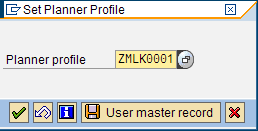
 Select go to Settings -> Planner Profile and select the previous created planner profile.
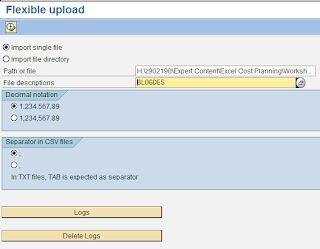
 In CJR2, select Extras -> Excel Planning -> Upload…; Then, locate the file and select the file descriptor assigned in the planner profile.
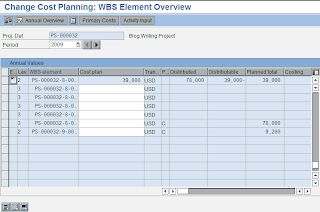 Select Primary Costs. (There must be a C in the plan value origin column for these WBS elements).
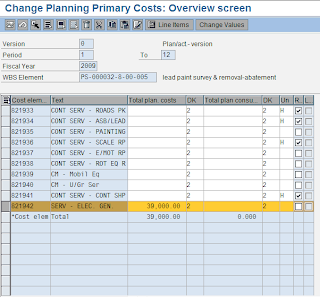 Go to the menu Go to -> Period Screen. The values entered for each of the 12 periods are displayed in the following screen.
This document outlines the configuration and procedure for maintaining monthly project cost planning values into a plan version using integrated Excel planning. The procedure begins with uploading plan values from an Excel spreadsheet where planning has been carried out offline. Once the values have been uploaded into SAP, they can easily be transferred to a different plan version or evaluated in the project information system.
NOTE: Cost planning by period requires that you plan by fiscal year, period and cost element. If required, a dummy cost element could be created and assigned to the planning profile assigned to the project profile.
Configuration
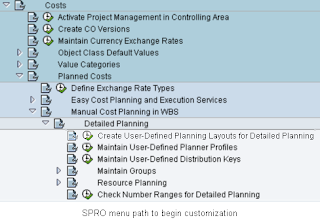
In transaction SPRO, expand the project system menu item and browse to the item below.
In transaction SPRO, expand the project system menu item and browse to the item below.

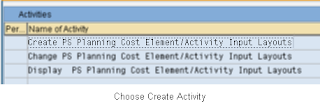
Choose the “Create Planning Layouts” activity.

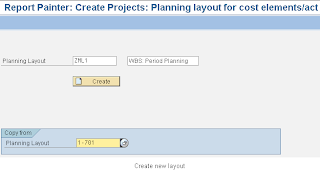
Copy Existing Planning Layout
Enter a name and description for the user-defined layout. Choose to copy the standard layout 1-701 (WBS elements: Standard cost elements).
Enter a name and description for the user-defined layout. Choose to copy the standard layout 1-701 (WBS elements: Standard cost elements).

Click on “Create”. The contents of the standard layout 1-701 are copied into the new user-defined layout along with the columns and variable definitions.

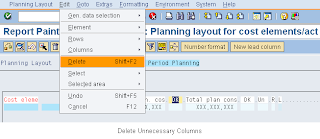
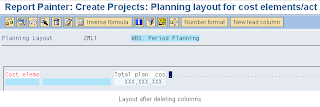
Remove Unnecessary ColumnsUnnecessary columns must be removed from the layout. Remove columns other than Cost element and Total Plan cost. Select each column and click on delete.

Click Yes to confirm deletion. The layout now looks like this.

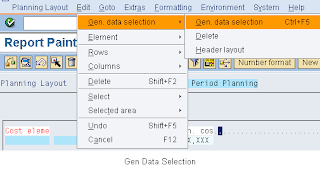
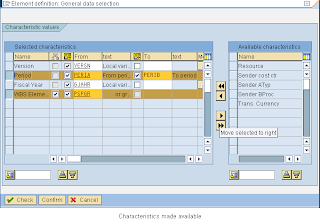
Make Characteristics Available as ColumnsSelect menu path Edit -> Gen. data selection -> Gen. data selection to make the WBS element and Period as available characteristics.


Move Period and WBS Element from Select characteristics into the Available characteristics. Check and Confirm the change.

Add Required Columns for Input
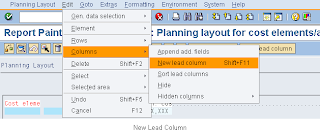
Add a new lead column to add the WBS Element.
Add a new lead column to add the WBS Element.


Move the WBS Element from Available characteristics to the Selected characteristics. Then, Check and Confirm the change.
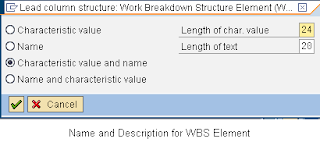
Select to display both Name and Description for the WBS Element.

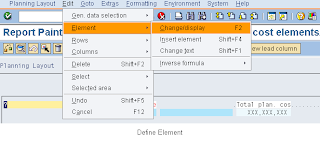
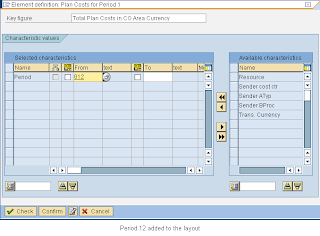
Now, add Period to the layout - select the Total plan cost column and select Edit -> Element -> Change/display. Drag the Period column from Available characteristics to the Selected characteristics and change values as below.

Check and Confirm changes.
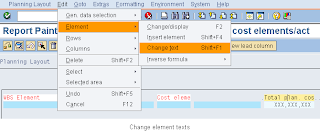
Select the Total Cost Plan column to change the column descriptions.
Select the Total Cost Plan column to change the column descriptions.
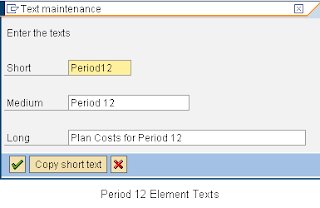
 Change the texts to something like this.
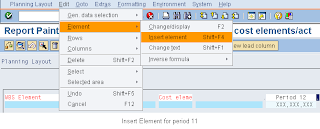
 Notice that the column text is now changed to Period 12. Click just next to the Period 12 column and follow the menu path below to create a column for Period 11.
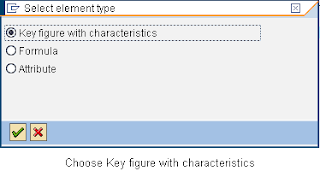
Choose “Key figure with characteristic”.

Enter Period 011 for the Period characteristic value.
 Change the texts on this element to reflect Period 11.
 Repeat the steps above to add periods 010 to 001. Note to click the cursor just next to the left-most Period column to insert a new column/element. When all the periods are done, the layout now looks like below.
 If all the columns don’t appear on the screen, click on the next page icon.
Create Planner Profiles
Select the configuration path to create planner profiles for cost planning.
 Click on New Entries. Enter Profile name and description.
 Select the line for the new planner profile and select “General Controlling”. Select “WBS Elements: cost elements/act input for Planning Area.
 Then, click on Layouts for Controlling. Select the checkboxes for Overview and Integrated Excel planning to allow for Excel planning upload for the planner profile. Also, enter a file descriptor.
 Click on Default Settings and enter a default version, fiscal year, WBS element and cost element and click on the Overview Screen icon.
 Click on Enable Macros. The planning layout is opened in Excel with the specified default parameters. Select to save the file descriptors and the excel file.
 Also, remember to save the excel file to the local disk since the file will be used to upload planning values later into SAP. Click the back icon and click Save again. The following message appears – “Preset parameters were saved”.
Procedure to Upload Excel Planning
Now that the configuration is in place, it’s time to upload the Excel file into SAP. The Excel file saved on the local disk is write-protected by default. Change this setting to make the Excel file ready for update by going to Tools -> Protection -> Unprotect in the Excel file.
In order to be able to review these costs later, make sure that the planning profile assigned to the project profile allows the planning cost elements used in the spreadsheet.
Complete cost planning offline in the Excel spreadsheet. Save the file as tab delimited text file. When the spreadsheet is ready for upload, go to transaction CJR2.
 Select go to Settings -> Planner Profile and select the previous created planner profile.
 In CJR2, select Extras -> Excel Planning -> Upload…; Then, locate the file and select the file descriptor assigned in the planner profile.
Click Execute to upload the file. Make sure that the system issues an OK confirmation.
Confirm Values in CJ40
Go to transaction CJ40 and enter the project number and the planning version used to upload project planning values. Choose the correct fiscal year used for the upload. Select the WBS elements for which the planning values were entered.
Go to transaction CJ40 and enter the project number and the planning version used to upload project planning values. Choose the correct fiscal year used for the upload. Select the WBS elements for which the planning values were entered.
 Select Primary Costs. (There must be a C in the plan value origin column for these WBS elements).
 Go to the menu Go to -> Period Screen. The values entered for each of the 12 periods are displayed in the following screen.
Additionally, the planning values thus uploaded into SAP can be evaluated using several standard SAP reports such as s_alr_87013534 and s_alr_87013544 depnding upon need.
I hope this provides an overview of cost planning using Excel integration for SAP Project Systems. Please feel free to leave your comments and suggetions.


Dear Muralidhar
ReplyDeleteExcellent article.
I'm looking forward to your new posts.
Best Regards
Amaresh Makal
Dear Murali,
ReplyDeleteGreat Job...
Thanks for sharing...
Tnx.
Great Job...
ReplyDeleteThanks Murali...
Murali,
ReplyDeleteThank you very much.
If u have any such documentation on RA, it will be very very helpful.
Hello Kishan,
ReplyDeleteThanks for the feedback and for reading my posts. I shall post something on RA soon.
Hi Muralidhar,
ReplyDeleteThanks for the excellent work. I've folowed your steps and successfully to upload cost plan for period 12. Unfortunately the values for other periods can't be uploaded eventhough system status was ok. Could you please help me, where my possibly mistake?
Once again thank you so much for your help.
Regards,
Deddy
Hello Deddy,
ReplyDeleteDid you try to compare your period 12 column structures/characteristics with other periods? Please make sure that the characteristics screen shows the correct period for each corresponding period column. Also, do you see the fields properly when you use the planner profile in CJR2? If you have already done these, please send me an email with screenshots for a couple of periods in addition to period 12 to lanka5255@gmail.com and I'll take a look.
Best Regards,
Murali Lanka
Just a quick update. I received a response from one of the other readers that they were able to upload the spreadsheet by making the WBS element as a local variable in the General Data Selection area in the layout. Please let me know if you are able to use this technique to cross your hurdle.
DeleteHi Murali,
ReplyDeleteThe procedure in the ECC6.0 EP4 has changed. For saving the file description one has to go to the default data and then open the excel in overview mode and click on SAVE DESCRIPTION icon.
Thanks,
Kishan Fatnani
Thanks Kishan.
ReplyDeletecan we do the revenue planning with excel integration in similar way
ReplyDelete